One of my favorite blogs, mish-mash baby food just posted an article by a guest blogger that posted a great article on kids lunches (who in turn was on another blog that I follow, Fed Up with School Lunches --- a very interesting idea for a blog about a teacher that only eats what is served in the school cafeteria, its gross, and eye opening). This article sums up exactly why I choose to make Jake's food from scratch from the start and trying to only feed him organic, wholesome toddler food. Its a good read, and good food for thought (pun intended).
http://fedupwithschoollunch.blogspot.com/2010/08/guest-blogger-it-starts-so-young.html
Monday, August 30, 2010
Wednesday, August 25, 2010
Eggplant Parmesan
A couple of weekends ago we went to my sister-in-law's cousins house for a family BBQ. Jacob immediately feel in love with his new favorite food, Eggplant Parmesan. Jake seriously could not eat it fast enough, so I knew we needed to make it at home. We have tried light versions in the past (baking vs. frying the eggplant), so I wanted to go that route when making it for Jake (and for my husband and I as well). We used the Cooks Illustrated Light Recipe for Eggplant Parm. This was an instant hit in toddler land. Jake was already finished with his 1st serving before I even had a chance to sit down for dinner. 2 servings later, I had one very happy and no longer hungry toddler on my hands. We made the full version that fills up a 9 x 13 glass baking dish and I froze half of it in individual serving containers for lunch or dinner for Jacob in the upcoming weeks.
Note: It is somewhat time consuming, so having 2 in the kitchen to prepare this is defiantly recommended!


Note: It is somewhat time consuming, so having 2 in the kitchen to prepare this is defiantly recommended!
2 pounds globe eggplant (2 medium eggplants), cut crosswise into 1/4-inch-thick rounds (I used a mandallon to cut the eggplant into perfect even rounds) Progressive International HGT-11 Folding Mandoline Slicer 1 tablespoon kosher salt 1.5 cups panko bread crumbs 1 tablespoon olive oil 1 ounce grated Parmesan cheese ½ cup unbleached all-purpose flour 3 egg whites + tablespoon water Ground black pepper 1 ½ teaspoon garlic powder Pam cooking spray 8 ounces reduced-fat mozzarella cheese, shredded (about 2 cups) 2 tablespoon minced fresh basil leaves Tomato Sauce 2 cans (28 ounces) diced tomatoes 4 medium garlic cloves, minced or pressed through a garlic press 1 tablespoon tomato paste 1 teaspoon extra-virgin olive oil 1/8 teaspoon red pepper flakes ½ cup minced fresh basil leaves Salt and ground black pepper | |||
Instructions:
-
Toss half of the eggplant with 1 teaspoon kosher salt, then place in a large colander set over a bowel. Repeat with the remaining eggplant and 1 more teaspoon kosher salt, and transfer to the colander with the first batch. Let sit until the eggplant releases about 2 tablespoons liquid, 30 to 40 minutes. Spread the eggplant slices on a triple thickness of paper towels and cover with another triple thickness of paper towels. Press firmly on each slice to remove as much liquid as possible, and wipe off the excess salt.

-
While the eggplant drains, prepare the tomato sauce. Process the tomatoes with their juices in a blender or food processor until mostly smooth; set aside. Cook the garlic, tomato paste, oil and pepper flakes in a medium saucepan over medium heat until the tomato paste begins to brown, about 2 minutes. Stir in the pureed tomatoes and cook until the sauce is thickened, about 25 minutes. Off the heat, stir in the basil an season with the salt and pepper to taste. Cover and set aside until needed.


-
Adjust the oven racks to the lower-middle and upper-middle positions and heat the oven to 475 degrees. Combine the bread crumbs and oil in a 12-inch nonstick skillet and toast over medium heat, stirring often, until golden, about 10 minutes. Spread the bread crumbs into a shallow dish and let cool slightly; when cool, stir in the ½ cup Parmesan. Combine the flower, garlic powder, and ½ teaspoon pepper together into a second shallow dish. In a third shallow dish, whisk the egg whites and water together. -
Line 2 rimmed backing sheets with foil and coat with Pam cooking spray. Season the eggplant with pepper. Lightly dredge one side of each eggplant slice in the seasoned flour, shaking off the excess. Dip the floured side of the eggplant into the egg whites, and then coat the same side with the bread crumbs. Press on the crumbs to make sure they adhere. Lay the eggplant breaded side up, on the baking sheets in a single layer.
Lightly spray the top of the eggplant slices with the Pam cooking spray. Bake until the op of the eggplant slices are crisp and golden, about 30 minutes, rotating and switching the baking sheets halfway through baking.

-
Spread 1 cup of the tomato sauce in the bottom of a 13 by 9-inch baking dish. Layer in half of the eggplant slices, breaded side up, overlapping the slices to fit. Distribute ½ cup of the sauce over the eggplant; sprinkle with half of the mozzarella. Layer in the remaining eggplant, breaded side up, and spread with 1 cup of the sauce, leaving the majority of the eggplant exposed so it will remain crisp; sprinkle with the remaining mozzarella. Layer in the remaining eggplant, breaded side up, and spread 1 cup of the sauce, leaving the majority of the eggplant exposed so it will remain crisp; sprinkle with the remaining mozzarella. Bake until bubbling and the cheese is browned, about 10 minutes. Cool for 5 minutes, then sprinkle with basil and serve, passing the remaining sauce and extra Parmesan separately.


Light Whole Wheat
I am a lucky woman who's husband loves to bake bread. Jake and I get to sit back and reap the benefits.
Jason uses this book all the time when baking bread for us:
The Bread Baker's Apprentice: Mastering the Art of Extraordinary Bread
Last night he made the Light Whole Wheat bread with honey. It was delicious and made the very perfect PB&J (well for us at least, not Jake since we haven't introduced peanuts yet). Tomorrow morning we're looking forward to a nice piece of toast with eggs.
Jason said it was easy (I'll take his word on it). Here's a link to the recipe.
Pictures of our final project:


Wednesday, August 11, 2010
Apples
Jake LOVES apples, but we've hit the independence phase where he doesn't want to be fed purees, so applesauce is out of the picture. We have 9 teeth total so far, but none that will allow Jake to bit into a crunchy crisp apple, so I'm constantely looking for soft, toddler friendly foods. I tried steaming some apples for him to get them soft and easy to eat ... lets just say my first batch is almost gone so its time to already make some more. I batch freeze these and keep them in a ziploc bag that allows me to just pull out exactly how many I need for lunch, dinner or snack time.
I highly highly recommend a apple peeler, it will become your best friend and is a staple item if you are making your own baby food. My peeler slices and cores the apples so it makes for a quick chop to make them into bite sized pieces. Back To Basics Apple And Potato Peeler
For this batch, I used a dozen golden delicious apples.

You just place each apple on the peeler ...

Crank the handle, and voila ...

Perfectly peeled, cored and sliced apples. All you'll have to do it slice then in half, then cut individual pieces from that. Super east, and quick too!

Place all of the cut pieces in a steamer basket with about an inch of water in a large pot, cover and steam for approximately 5 - 10 minutes until you have reached desired texture. Start your cooking time once you have started to steam.
I will then Pam a baking sheet, place the apple pieces on the baking sheet and freeze for a minimum of 4 hours (up to 24 hours).

Once frozen, using a spatula remove the apples, place in a ziploc freezer bag and keep in your freezer for up to 3 months (if they last that long!). For an added treat, once defrosted (place in a microwave safe dish and microwave on high for 30 seconds - 1 minute) I sprinkle cinnamon and sugar, which Jake loves!
Sunday, August 8, 2010
Sweet Potatoes
Jake's favorite food has always been sweet potatoes, and now that he refuses to eat purees I have been trying to think about how to keep sweet potatoes in his diet while doing a big batch cooking. I tried roasted sweet potatoes tonight, which were a huge hit and I have a giant bag of potatoes in my freezer for future meals which is a huge bonus.
Ingrediants
3 medium sweet potatoes
2 tablespoon vegetable oil
1/2 teaspoon salt
1/4 teaspoon pepper
Pam cooking spray
Directions
1. Preheat oven to 350 degrees
2. Wash and peel sweet potatoes
3. Dice sweet potatoes into small sqaures


4. Toss sweet potatoes with oil, salt and pepper in a large bowl

5. Spray baking sheet with Pam [Pam Original Cooking Spray, 6 oz ] and lay sweet potatoes on baking sheet.

6. Cook for 40 - 50 minutes, stirring / tossing sweet potatoes every 10 minutes until tender.

For freezing:
7. Let sweet potatoes cool on the baking sheet completely, then place entire sheet in the freezer for at least 4 hours, but not to exceed 24 hours.
8. Using a spatula, remove sweet potatoes and place in a ziploc freezer bag.
To reheat:
9. I'll take approx. 1/4 cup per serving, place in a microwave safe bowl and book for 45 seconds - 1 minute on high until cooked completely.
Ingrediants
3 medium sweet potatoes
2 tablespoon vegetable oil
1/2 teaspoon salt
1/4 teaspoon pepper
Pam cooking spray
Directions
1. Preheat oven to 350 degrees
2. Wash and peel sweet potatoes
3. Dice sweet potatoes into small sqaures


4. Toss sweet potatoes with oil, salt and pepper in a large bowl

5. Spray baking sheet with Pam [Pam Original Cooking Spray, 6 oz

6. Cook for 40 - 50 minutes, stirring / tossing sweet potatoes every 10 minutes until tender.

For freezing:
7. Let sweet potatoes cool on the baking sheet completely, then place entire sheet in the freezer for at least 4 hours, but not to exceed 24 hours.
8. Using a spatula, remove sweet potatoes and place in a ziploc freezer bag.
To reheat:
9. I'll take approx. 1/4 cup per serving, place in a microwave safe bowl and book for 45 seconds - 1 minute on high until cooked completely.
Thursday, August 5, 2010
Veggie Pasta
I found this pasta when wandering the pasta aisle for dinner ideas. I thought it would make a great toddler food, and for 4oz. you get a full serving of veggies! (at least that's what the box says) I normally like tri-color rotini, but this one was different, it actually tasted like vegetables. The dish was very yummy, and best of all, Jake approved.
 Ingredients
1 lb Ronzoni Garden Delight Rotini Pasta
1 bag frozen diced veggies (I used Cascadian Farms organic carrots, peas and corn)
2 tablespoon olive oil
1/2 teaspoon garlic powder
1/4 cup fresh grated parmigiano reggiano cheese
Salt
Pepper
Directions
1. Cook pasta according to box, boil 9 minutes.
2. While the pasta cooks, place frozen veggies in a microwave safe bowl with 4 tablespoons of water, cover and cook on high for 6 minutes (I do 2 minutes over the maximum time on the instructions to ensure soft toddler friendly vegetables).
3. When pasta is done cooking, drain and place back in the pot and toss with olive oil, garlic powder, parmigiana cheese, cooked vegetables, salt and pepper to taste.

I made the full batch of pasta and divided it up in Rubbermaid Take & Toss containers. Note - I really like these because of their twist lock feature. I'll pop them out of the freezer to the fridge the day I want to serve them to defrost, or just do right from freezer to the microwave. They also travel well to daycare if planning meals ahead at the beginning of the week.


1 lb Ronzoni Garden Delight Rotini Pasta
1 bag frozen diced veggies (I used Cascadian Farms organic carrots, peas and corn)
2 tablespoon olive oil
1/2 teaspoon garlic powder
1/4 cup fresh grated parmigiano reggiano cheese
Salt
Pepper
Directions
1. Cook pasta according to box, boil 9 minutes.
2. While the pasta cooks, place frozen veggies in a microwave safe bowl with 4 tablespoons of water, cover and cook on high for 6 minutes (I do 2 minutes over the maximum time on the instructions to ensure soft toddler friendly vegetables).
3. When pasta is done cooking, drain and place back in the pot and toss with olive oil, garlic powder, parmigiana cheese, cooked vegetables, salt and pepper to taste.

 | |||
| toddler = approved! |


Monday, August 2, 2010
Beans
This toddler food turned into toddler food as my mistake. My husband started soaking the beans overnight to make baked beans the following day for our family that came up to visit for a bbq. They have to boil for an 1/2 hour to an hour (give or take) then get bbq'ized and baked. I was put in charge of watching the beans while he mowed the grass. I watched them all right, I watched them get really soft and start to break open (thus becoming to soft to then bake and make into baked beans). Instead of wasting an entire batch of beans, we came up with a bean recipe that Jake (and we) loved as a side dish. My husband and I ate them as a side dish to sandwich night, and Jake ate them (scrap that, devoured them) when I mixed in some fresh corn from the cob that I had made the night before.
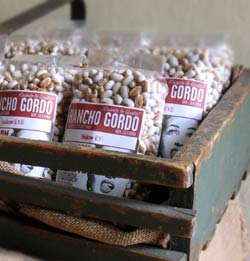
We use Rancho Gordo yellow eyed beans. All the beans that we've ordered from these folks have been delicious!
Ingredients
1 lb. beans
3 tablespoon table salt (or 6 tablespoons if using Kosher salt) + pinch for seasoning
2 sprigs of thyme
1 tablespoon oregano (dried)
1 small yellow onion, peeled and chopped into quarters
1 clove garlic, peeled and smashed
Olive oil
Directions
1. Soak beans overnight with 4 quarts of water and 3 tablespoon of table salt. Soak at least 8 hours but no longer than 12 hours.
2. Rinse beans thoroughly and place in pot with enough water to cover by an inch. Add thyme, oregano, black pepper, onion and garlic.
3. Bring to a gentle simmer and simmer until tender, approx. 45 minutes to an hour.
4. When beans are done cooking, remove thyme, onion and garlic, discard.
5. Drain beans and toss with drizzle of olive oil and a pinch of salt.
I found the best way to save them as toddler food to dish them in a muffin tin, freeze and when they are frozen, pop out each muffin tin into a freezer bag for single serving portions. To reheat, put in a microwave safe bowl, cover with a wet paper towel, and microwave on high, approximately 45 seconds - 1 minute.

Mix with your child's favorite diced veggies or a good side dish, or even main course for lunch or dinner.
We use Rancho Gordo yellow eyed beans. All the beans that we've ordered from these folks have been delicious!
 |
| www.ranchogordo.com |
Ingredients
1 lb. beans
3 tablespoon table salt (or 6 tablespoons if using Kosher salt) + pinch for seasoning
2 sprigs of thyme
1 tablespoon oregano (dried)
1 small yellow onion, peeled and chopped into quarters
1 clove garlic, peeled and smashed
Olive oil
Directions
1. Soak beans overnight with 4 quarts of water and 3 tablespoon of table salt. Soak at least 8 hours but no longer than 12 hours.
2. Rinse beans thoroughly and place in pot with enough water to cover by an inch. Add thyme, oregano, black pepper, onion and garlic.
3. Bring to a gentle simmer and simmer until tender, approx. 45 minutes to an hour.
4. When beans are done cooking, remove thyme, onion and garlic, discard.
5. Drain beans and toss with drizzle of olive oil and a pinch of salt.
I found the best way to save them as toddler food to dish them in a muffin tin, freeze and when they are frozen, pop out each muffin tin into a freezer bag for single serving portions. To reheat, put in a microwave safe bowl, cover with a wet paper towel, and microwave on high, approximately 45 seconds - 1 minute.

Mix with your child's favorite diced veggies or a good side dish, or even main course for lunch or dinner.
Subscribe to:
Posts (Atom)