Thursday, October 27, 2011

Pumpkin Krispies

Pumpkin Rice Krispies

I found these through a facebook friend and knew right away this was what Jake was going to bring to his Halloween party at school.  Who doesn't love rice krispies?? Who doesn't love anything with a cute pumpkin face?? I'm hoping the kids at school feel the same way!

These were so incredibly easy to make.  In the time it took me to boil pasta for our dinner tonight I was already done melting the marshmallows and shaping each pumpkin.  I also love that Jake is already at that age where he can help in the kitchen.  We had fun getting these together .. although his major contribution was stealing marshmallows! Then begging for more "krispie batter".  Rice krispies before dinner? I don't see why not!


Ingredients
6 cups rice krispies
1 bag large marshmallows
1/2 stick butter, put into pieces
Non-Stick Spray
Red Food Coloring
Yellow Food Coloring
Pretzel Sticks
Green Frosting
Black Frosting

1. Melt butter and marshmallows in a microwave safe bowl for 45 seconds on high.  Stir.  Repeat cooking on high and stirring until marshmallows are melted.
2. Add approx. 8 drops of yellow food coloring and 4 drops of red food coloring to marshmallow mixture.  Stir well.  Adjust color until you come up with the perfect orange.
3. Spray your hands with Pam non-stick spray and roll each pumpkin into a 2-3 tablespoon ball (more or less for your liking).  I also sprayed a 24 mini-muffin pan and placed each ball into that to cool.  Try to work quickly before the rice krispies start to harden.
4. Cut the pretzel sticks into 2 pieces and place in the center of each pumpkin (for the stem).
5. Allow to cool and harden for at least 30 - 60 minutes. Resist your husband from eating to many during the cooling processes (AHEM!).
6. Decorate with green frosting around the stem to resemble the leaves of the pumpkin and black frosting to create fun and silly faces.  I used Wilton Sparkle Gel for the green and black frosting.
7. I put in the fridge for 60 minutes for the frosting to harden, but take out in time to come back to room temperature before eating.

Enjoy! Happy Halloween from Hungry Hungry Jacob!!

Our Pumpkin Patch

Monday, October 24, 2011

Bran Raisin Muffins


Don't knock the bran muffins till you try them! They are a huge hit for breakfast with Jacob and such a quick, easy breakfast or snack in his lunch (and mine!).  One muffin will fill you up for the morning.  My original recipe had 1/3 cup molasses for the sweetener, but it needed to just be a tad sweeter.  The molasses did give it an excellent flavor, so next time I’ll follow the instructions below for a sweeter muffin.

Dry Ingredients
1 cup all-purpose flour
1 cup course bran flakes
1/2 teaspoon salt
3 teaspoons baking powder
1 teaspoon cinnamon
1/2 teaspoon allspice
1/2 cup raisins
Wet Ingredients
1/4 cup sugar, or to taste
1/3 cup molasses
2 eggs
1 cup milk
3 tablespoons melted butter

Instructions
1. Heat the oven to 400°F. Grease a 12-cup muffin tin with Pam Cooking Spray for Baking.
2. Mix together the dry ingredients in a bowl. Beat together the wet ingredients another bowl. Make a well in the center of the dry ingredients and pour the wet ingredients into it. Using a large spoon or rubber spatula, combine the ingredients swiftly, stirring and folding rather than beating and stopping as soon as all the dry ingredients are moistened. The batter should be lumpy, not smooth, and thick but quite moist; add a little more milk or other liquid if necessary.
3. Spoon the batter into the muffin tins, filling them about two-thirds full and handling the batter as little as possible. (If you prefer bigger muffins, fill 8 cups almost to the top; pour 1/4 cup water into the empty cups.) Bake for about 20 -25 or until nicely browned and a toothpick inserted in the center of a muffin comes out clean. Remove from the oven and let rest for 5 minutes before taking them out of the tin.

Sunday, October 9, 2011

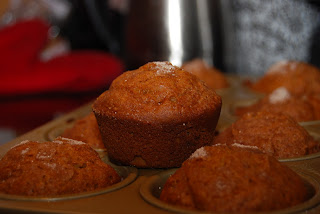
Spiced Pumpkin Muffins

Tis the season! Well, not really since this October Sunday is current 85 DEGREES outside.  I refuse to let the warm weather take me out of the fall / baking mode.

Trader Joe's now has their Organic Pumpkin Puree's available, so muffins/breads immeditaely popped into my mind.  Such and easy thing to pack in a toddler lunch box for a nice healthy snack.

Recipe Note:  Your house will smell AMAZING when these cook (even on a hot October day!)

Spiced Pumpkin Muffins

INGREDIENTS:
1.5 cups all-purpose flour
1 tsp baking powder
1/2 tsp baking soda
1/2 tsp salt
3/4 tsp cinnamon
1/4 tsp nutmeg
1/4 tsp ground cloves
1/4 tsp ground ginger
1/2 tsp allspice
1 cup canned solid-pack pumpkin
1/3 cup vegetable oil
2 large eggs
3/4cups sugar
1/4 cup honey (alternatively you can just use 1.25 cups sugar)

Topping:
1 tsp cinnamon
1 tbsp sugar


DIRECTIONS:
Put oven rack in middle position and preheat oven toe 350F. Spray muffin tin with Pam Cooking Spray for Baking.

Whisk together flour, baking powder, baking soda, salt, cinnamon, nutmeg, cloves, ginger and allspice in a small bowl.

Whisk together pumpkin, oil, eggs, 3/4 cups sugar, and honey in a large bowl until smooth, then whisk in flour mixture until just combined.

For topping: Stir together cinnamon and remaining 1 tablespoon sugar in another bowl.

Divide batter among muffin cups (each should be about 3/4 full), then sprinkle tops with cinnamon-sugar mixture. Bake until puffed and golden brown and a wooden pick or skewer inserted into center of a muffin comes out clean, 25 to 30 minutes.

Cool in pan on a rack 5 minutes, then transfer muffins from pan to rack and cool to warm or room temperature.

Sunday, September 18, 2011

Lasagna AKA Pizza Noodles


 With the beautiful fall weather this weekend we wanted a hearty and warm dinner.  Lasagna was the first thing that popped into my mind and knowing our Hungry Hungry Jacob, we knew it would be an instant hit (well, we at least thought). 

We used the Simple Lasagna with Hearty Tomato sauce from Cooks Illustrated.  It was DELICIOUS! However, Jacob was a little resistant to try it until he really studied it for a minute and then declared they were called Pizza Noodles.  Once we all agreed we were eating Pizza Noodles, they were gone quicker then we could blink.  Definitely on the rotation of weekend meals in this house!

This made a ton of food! Instead of packing it up for lunch or leftovers for the entire week, I reserved enough for one more family meal and then cut up toddler lunch portions for the rest.  I froze the lunch portions on a baking sheet and once frozen wrapped in saran wrap, tin foil and then put in a freezer bag for 6 toddler lunch / dinners when needed in a pinch.  Now Jake can have his Pizza Noodles anytime!

Individually Frozen Pieces


From Cooks Illustrated:
If you can’t find meatloaf mixture for the sauce, or if you choose not to eat veal, substitute 1/2 pound ground beef and 1/2 pound sweet Italian sausage, casings removed, for the meatloaf mixture. The assembled, unbaked lasagna, if wrapped tightly in plastic wrap and then in foil, will keep in the freezer for up to 2 months. To bake, defrost it in the refrigerator for a day or two and bake as directed, extending the baking time by about 5 minutes.

Ingredients

Tomato-Meat Sauce
  • 1tablespoon olive oil
  • 1 medium onion , chopped fine (about 1 cup)
  • 6medium cloves garlic , pressed through garlic press or minced (about 2 tablespoons)
  • 1pound meatloaf mix or 1/3 pound each ground beef chuck, ground veal, and ground pork (see note)
  • 1/2teaspoon table salt
  • 1/2teaspoon ground black pepper
  • 1/4cup heavy cream
  • 1 can (28 ounces) tomato puree
  • 1 (28-ounce) can diced tomatoes , draine
Ricotta, Mozzarella, and Pasta Layers

Instructions

  1. Adjust oven rack to middle position and heat oven to 375 degrees.
  2. Heat oil in large, heavy-bottomed Dutch oven over medium heat until shimmering but not smoking, about 2 minutes; add onion and cook, stirring occasionally, until softened but not browned, about 2 minutes. Add garlic and cook until fragrant, about 2 minutes. Increase heat to medium-high and add ground meats, salt, and pepper; cook, breaking meat into small pieces with wooden spoon, until meat loses its raw color but has not browned, about 4 minutes. Add cream and simmer, stirring occasionally, until liquid evaporates and only fat remains, about 4 minutes. Add pureed and drained diced tomatoes and bring to simmer; reduce heat to low and simmer slowly until flavors are blended, about 3 minutes; set sauce aside. (Sauce can be cooled, covered, and refrigerated for up to 2 days; reheat before assembling lasagna.)
  3. Mix ricotta, 1 cup Parmesan, basil, egg, salt, and pepper in medium bowl with fork until well-combined and creamy; set aside.
  4. Assemble first lasagna layer according to illustrations below. Repeat layering of noodles, ricotta, mozzarella, and sauce two more times. Place 3 remaining noodles on top of sauce, spread remaining sauce over noodles, sprinkle with remaining cup mozzarella, then with remaining 1/4 cup Parmesan. Lightly spray a large sheet of foil with nonstick cooking spray and cover lasagna. Bake 15 minutes, then remove foil. Return lasagna to oven and continue to bake until cheese is spotty brown and sauce is bubbling, about 25 minutes longer. Cool lasagna about 10 minutes; cut into pieces and serve.

    Jacob Approved!


    Assembling Lasagna - From Cooks Illustrated:
1. Smear entire bottom of 9- by 13-inch baking dish with 1/4 cup meat sauce. Place 3 noodles on top of sauce.

2. Drop 3 tablespoons ricotta mixture down center of each noodle. Level by pressing flat with back of measuring spoon


3. Sprinkle evenly with 1 cup shredded mozzarella.

4. Spoon 1 1/2 cups meat sauce evenly over cheese.

Carrot Pineapple Muffins

We made these this weekend, thanks to the recipe from Weelicious.  They weren't to bad ... I got the thumbs up from Jake and Grandpa Johnny too!


Pineapple Carrot Muffins (Makes 14 Muffins)
1 1/4 Cup All Purpose Flour
3/4 Cup Wheat Flour
2 Tsp Baking Powder
1/2 Tsp Baking Soda
1/2 Tsp Salt
1/2 Cup Butter, melted
1/2 Cup Honey
2 Eggs
1 Tsp Vanilla Extract
1/2 Cup Pineapple, chopped fine and drained well OR 1 8 oz Can Crushed Pineapple, drained well
1 Cup Shredded Carrot (about 2 Large Carrot)

1. Preheat oven to 350 degrees,
2. In a large bowl combine the flours, baking powder, baking soda and salt.
3. In a separate bowl combine the butter and honey using a whisk.
4. Add the eggs and whisk to combine.
5. Add the vanilla, pineapple and carrots to the butter mixture.
6. Stir in the dry ingredients, making sure not to over mix.
7. Scoop the batter into regular size, paper lined muffin cups.
8. Bake for 22 minutes or until a toothpick comes out clean.
9. Cool and serve.

Tuesday, September 6, 2011

Peach Puree

Super easy ... you won't buy a canned peach puree again.

1. Cut ripe peaches in half and take out the pit. 
2. Place face down in a glass baking dish with 1/4 inch water, cover with saran wrap and microwave on high for 3 minutes.
3. Remove saran wrap, flip over each peach half, recover and microwave on high for 2 minutes.

4. Test peach for for softness (each should easily been mashed with a fork).  If additional time is needed, recover and cook at minute increments (shouldn't take more than 6-7 minutes).
5. Remove outside skin (should easily be removed after they are steamed) and puree in a food processor.  Add water (from steam container) as needed until reach desired consistency. 

Here I added the peach puree to previously made applesauce for our very own apple peach sauce! YUM!

Applesauce

I couldn't let a FULL year go by without posting, so here's a stab at bringing Hungry Hungry Jacob back to life! Now that fall is on it's way, I'll be headed back into the kitchen more often (also see: happy husband).

This is a recipe I've been making for a while, just in the fall time when we head up to our favorite apple orchard, Bolton Spring Farm in Bolton, MA.  This past weekend we picked up 3 bags of great applesauce apples made up of Paul Red and Gravenstein apples. 

Ingredients
12 - 14 apples cored and quartered
1/2 cup water (more if needed)
3 tablespoon dark brown sugar
2 teaspoon cinnamon
1/2 lemon, squeezed
1/4 teaspoon salt


Tip for cutting apples: I saw this tip on Food Network and it does save a lot of time.  Since you want to keep the peels on the apples (for extra flavor), cut the apples in quarters:

Holding the apple quarter, slice off the core:
 And voila... you have a cored, quartered apple!
1. Over medium heat, simmer all ingredients for 15 minutes.  

Keep an eye on the water level, it the apples appear dry, add another 1/2 cup of water.  Gravenstein and Paul Red apples break down quickly and expel a good amount of water, so only a 1/2 cup was need for this recipe.

Stir and mash the apples until each apples breaks down:
 
2. Once the apples are soft, take off the heat to cool.
3. Spoon the apple mixture into a ricer and squeeze the applesauce into a clean bowl.  The ricer will leave the peels behind.  Continue until you have processed all of the applesauce through the ricer.


4. Taste the applesauce for sweetness and cinnamon.  Add additional brown sugar or cinnamon as needed.

5. This batch made A LOT of applesauce.  I kept a portion in the fridge for us to eat during the week and froze in individual batches for Jacob's school lunches.  I found the best way to freeze portions for my hungry toddler in muffin tins.  Spray the muffin tin with Pam Non-Stick spray, spoon the applesauce into the muffin tin and cover (once cooled) with saran wrap and tin foil.  Once froozen, pop out the individual portions to a freezer bag and defrost individually.


Babyfood Puree Tip: I easily did this recipe when I was making Jacob's fruit purees.  I would omit the sugar, cinnamon and salt and cook as indicated above.  I would continue to use the ricer to remove the apple peels, but then run the applesauce through a food processor until I reached the appropriate consistency.  You can add additional water as needed.
Related Posts with Thumbnails